Como faziam fotos incíveis sem usar photoshop antigamente (década de 1950)
fonte : revista Mecânica Popular de 1955
HOW TO MAKE INCREDIBLE PICTURES (Sep, 1955)
Source: Popular Mechanics ( More articles from this issue )
Issue: Sep, 1955
This stuff was a bit harder before photoshop.
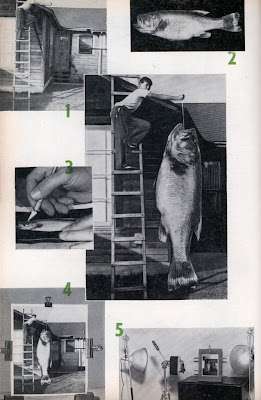
The basic print on which the cut is later pasted is made first. See step 1 on the opposite page, and photo B above. This should be a sharp print with good middle tones. Use a ruler on this print to determine the exact size of the cutout needed. Next place the cutout negative, step 2, and photo A, in the enlarger and adjust the size of the cutout image to suit. The print should be made on single-weight glossy paper. Using an old magazine as a cutting board, cut carefully along the outline of the subject, step 3. Slant the knife away from the subject so that blade undercuts the edge.
Como fazer...
The basic print is now placed on the cardboard, the cutout is arranged in place, and the sheet of glass is clamped over the combination, as in step 4. The last step, 5, is to photograph the composite picture. Two lights (house lamps of 150 watts will do) in reflectors are used, one on each side of the camera. The composite is propped up against a solid support, and a check should be made to see that the glass is not reflecting the light. The camera height is adjusted until the lens is 2 or 3 in. above the center of the picture, and then tilted slightly downward until the picture is centered on the ground glass. With a lens opening of f:8, use an exposure of 1/25 sec. if the camera is 2 ft. from the subject; 1/10 sec. at 3 ft.; or 1/5 sec. at 4 ft. On cameras having no focus control, use an inexpensive portrait lens. * * *
do site: http://blog.modernmechanix.com/2006/07/29/how-to-make-incredible-pictures/
